Oct 25, 12 , 2018 – After our Baltic’s trip, I was excited to jump ahead to Lesson 17 in the workbook to start learning inlay. And not just Normal 1/4″ thick inlay, but I want to do a crazy 3/4″ thick inlay. This means stack cutting 1.5″. There were a couple of lessons learned during this otherwise failure.
First, I learned that #3 blades cut maple and walnut super smooth. Like crazy smooth. Next, I learned that I have a very bad habit of pushing the blade to cut faster. When the cut is over a 1.5″ height, there becomes a noticeable bow in the middle of the cut. The inlay wasn’t off by just a little. It completely didn’t work at all! (In another project, I’ll learn that pushing the blade also leads to the super smooth edge.) Third lesson I learned is that I am not replacing my blades once they are dull and this leads to me pushing the blade instead of letting the blade cut. Later, I’ll also learn that a 1.5″ cut should be done with a bigger blade, like a #12.
So, I regrouped and decided I should start back at lesson 14, which is Relief Cutting, and try to break my bad habit. You are probably wondering what happened to lessons 9-13. Those lessons cover cutting non-wood materials, like paper, plastic, and metal. I may come back to them later.
Exercise 14 from: Scroll Saw Workbook by John A. Nelson
Objective: To study the basics of relief cutting and make a Relief Cut blade/angle tester for future reference.
Materials needed:
- 3/4″ x 4.5″ x 7.5″ pine
- #5 skip tooth blade
- Wood glue
Larger blade sizes will make larger kerfs. By cutting at an angle, you can make a piece either stick out or recess into the backing. How it offsets depends on four things: thickness of the blade/kerf, thickness of the wood, the angle of the cut, and the direction of the cut.
Here’s how they turned out!
Lesson 17 failure:
So smooth, but you can see the hour glass shape if you look at the right edge of left heart. These weren’t sanded, they came out like that.

Lesson 14 success:
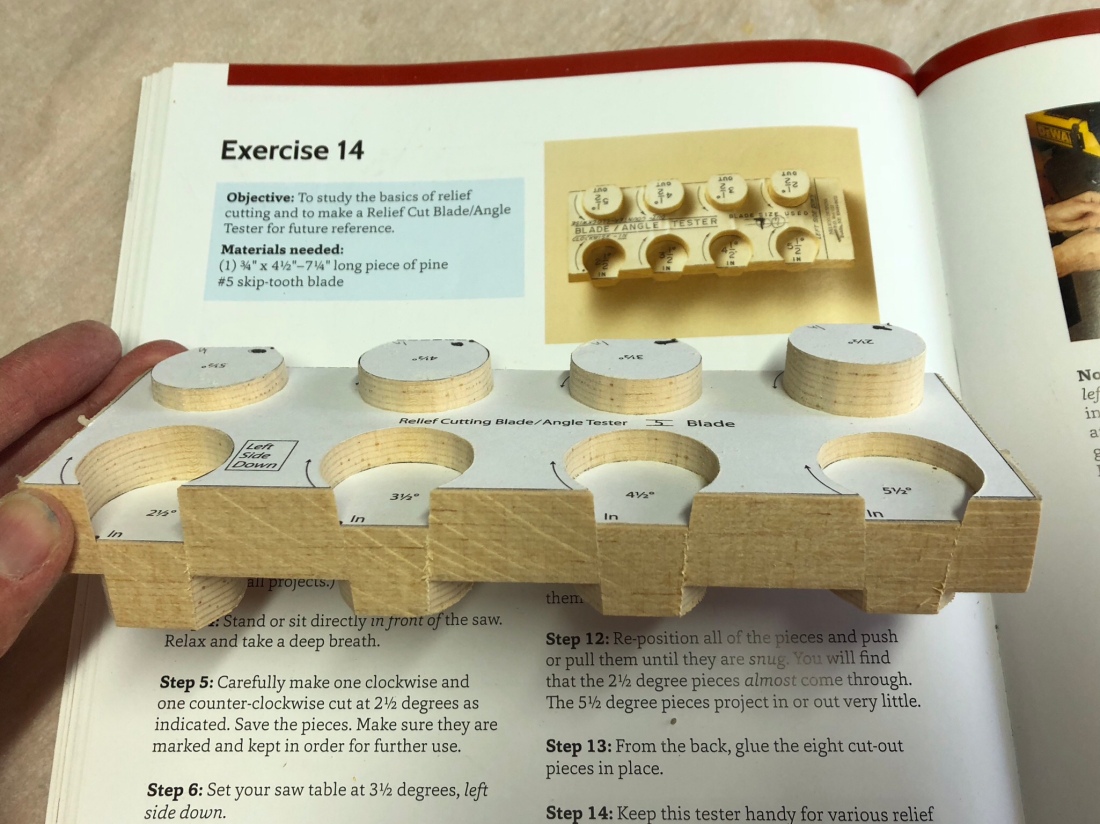
As you see the final test piece above, the 2.5deg angle is the largest relief and 5.5deg is the smallest. If I was going for inlay, you can imagine another piece of wood above or below the one in the pic. And you can imagine how that 2.5deg piece is getting close to fitting into the next board… maybe just .2 inches more to go. It makes me think 1.5deg might be close for inlay, if I could just not push the blade!
———————————–
The end.
———————————–

Your expertise grows!
LikeLike
Thanks! It is fun that I’m still learning.
LikeLike